
When working with rope - whether you are a worker at height, rope access technician, or rescuer - it is important to have extensive knowledge of the different types of knots and for which circumstances they are deemed best. Each specific situation needs a specific knot to ensure your safety, the safety of others around you, and increase your job performance efficiency.
This article will discuss 10 essential knots for rope access work and show you how to tie them. We will focus on four different types of rope access knots:
These are all especially important to guarantee safe and efficient rope access work.
Some knots are easy to tie, and others require practice to master the tying. One thing to remember is that each knot creates an area of increased stress on the rope that weakens the rope. The decrease in strength depends on the knot type - some of them may weaken the rope by more than 45 %. Do not worry, you will find out which one it is later in the article.
Let’s look at all 10 of these essential knots for rope access technicians.
1. Knots for joining two ropes
When it comes to connecting two ropes, tying them together is the fastest way to do so. There are several factors to consider when selecting the best knot to join two ropes, for example, the rope type or the rope diameter, as some knots can only be used with ropes of the same diameter.
We will outline three different knots for connecting two ropes.
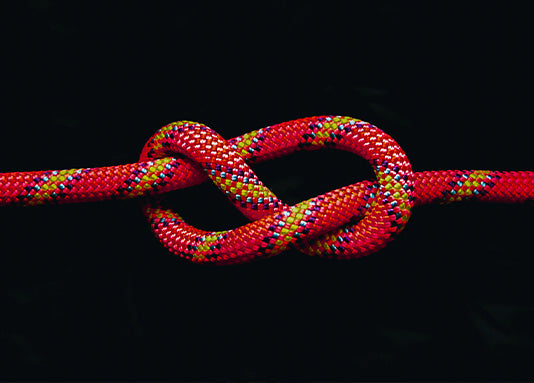
Figure-eight knot
The figure-eight knot is suitable for joining two ropes of the same type and equal diameter. The knot should not be used if ropes differ too much in diameter. The figure-eight knot is strong, easy to tie and untie. It is a common knot used in rescue operations and climbing.
Ropes are joined together at the end of one rope loop. Due to this knot’s nature, it is necessary to leave at least a 10 cm long tail of the rope. Another option is to tie a backup knot, such as a double fisherman’s knot, especially if the knot is being used in critical applications.
The figure-eight knot’s disadvantage is that it can be bulky when a backup knot is added for extra security. Based on the test performed by Singing Rock, the figure-eight knot reduces the strength of the rope in laboratory conditions by approximately 46%.
How to tie a figure-eight knot
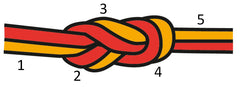
So, how do you join two ropes together using the figure-eight knot? It is illustrated in the picture below.

When tying this knot make sure that both ropes remain parallel to each other at all points and that they do not cross over. In the end, tighten the knot by pulling each rope tight individually. When the knot is finished, you should see 5 sets of parallel lines, as shown in the picture:
Double fisherman knot
Another powerful and reliable way of joining two ropes is to use the double fisherman knot. The knot is easy to tie but not as easy to untie as the figure-eight knot. Another difference from the figure-eight is that the double fisherman knot can join two ropes of different types or different diameters. It is also less bulky than figure eight-knot.
The double fisherman knot is commonly used in rescue operations or as a backup for other knots. This knot reduces the rope strength in laboratory conditions by approximately 32%, so not as much as the figure-eight.
But be careful. If the double fisherman knot is tied wrongly, it is likely to fail. Make sure you get it right before using it.
How to tie a double fisherman knot
If you want to learn how to tie the double fisherman knot, check out the steps in the picture below.

When the knot is tied, it shows a symmetrical structure and tails should be on opposite sides. From one side, the double fisherman knot should look like two letters X next to each other, and when you flip it around you should see four parallel lines (as shown in the 4th step in the picture above).
Overhand follow-through knot
A simple and fast knot for joining two ropes or slings together. The overhand follow-through knot is very useful when speed is critical to safety. The knot’s disadvantage is that it is harder to untie after loading. Overhand knot reduces rope strength by approximately 30-35%.
How to tie an overhand follow-through knot:
Tying the overhand follow-through knot is quick and simple, and you will make it in these three simple steps:

2. Friction knots
Friction knots are another important type of knot for rope access technicians. They help to ascend a fixed rope – which can be very useful in rescue situations. The friction knot is a loop of one rope or a thin sling attached to a thicker climbing rope in a way that is easily adjustable.
When ascending with a friction knot, a worker can move the knot easily up the rope. When the knot is loaded with the worker’s weight, it tightens its grip around the rope. The friction created prevents the knot from sliding down allowing the worker to ascend.
Friction knots are an alternative to mechanical ascenders. Their advantage over ascenders is that they do not damage the rope like an ascender, which uses teeth to catch the rope.
We will mention two basic friction knots, both very simple, easy to learn, and easy to tie.
Let’s start with the most popular one;
Prusik Knot
This is the most commonly used friction knot for ascending a rope. The Prusik knot is simple and easy to tie. The advantages of this knot are that it is possible to make it with one hand only, and it does almost no damage to the rope the knot is tied to. Usually, accessory cords of smaller sizes with 5 mm or 6 mm diameter are used when tying the Prusik knot. The ends of the accessory cord are often tied with a double fisherman knot.
The Prusik knot is very helpful for ascending during rescue works.
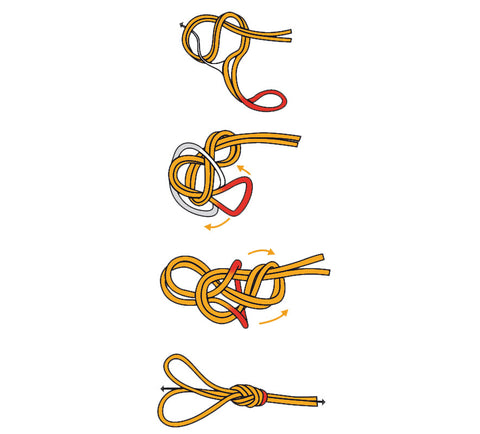
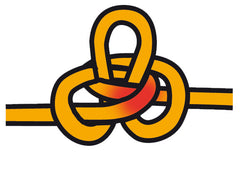
How to tie a Prusik knot
Instructions in the picture below will help you tie the Prusik knot.
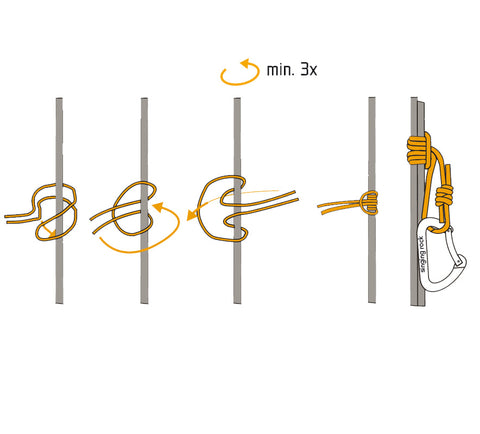
When tying the Prusik knot make sure that all strands line neatly beside each other and that that they do not cross.
Klemheist (Machard) knot
The Klemheist (or Marchand) knot is another commonly used friction knot for ascending a rope. Just like the Prusik, it slides easily on a rope while unloaded but locks when loaded.
The Klemheist knot is possible to tie from slings of thicker diameter - up to 9mm. It is faster to tie than Prusik, and it can be easily untied after being loaded. However, the main difference between Prusik and Klemheist is, that the Klemheist knot can be loaded from one direction, while the Prusik knot works in both directions. Therefore, before using the Klemheist knot, pay attention to how you tie it – whether the knot is set up correctly for use in the right direction. Also, make sure that all strands line neatly beside each other.
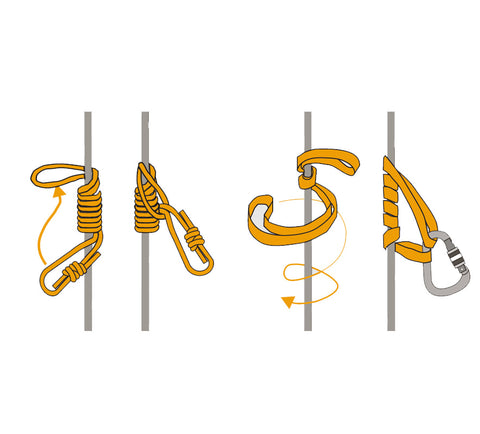
How to tie a Klemhesit knot
3. Anchoring knots for rope access
Let’s move to another type of rope access knots – anchoring knots. Anchoring knots help rope access technicians to secure a rope to an anchor. There are several factors to consider when selecting the best anchor knot for any given situation, such as your skills with some more complicated anchor knots and the shape of an object the knot is tied to.
Clove hitch knot
The clove hitch is a commonly used knot when attaching a rope to an anchor. This knot is also easy to tie, and you can easily untie it even after loading (unless you are using a very thin rope – in this case, it can be more difficult to untie when heavily loaded). The clove hitch reduces the rope strength in laboratory conditions by approximately 12%.
First and foremost, when using a clove hitch you should be aware that the slipping is a big issue with this knot, and you should never use it by itself without a backup. That’s why it is necessary to tie a backup knot, such as the double fisherman knot. And importantly, the clove hitch should always be tied to a round object, such as an ax, post, or tree, as it can be unreliable when tied to a rectangular or square object.
How to tie a clove hitch

When the knot is finished, make sure that the strands on the anchor are nice and tight beside each other.
Double figure-eight loop
The double figure-eight loop is another common anchor knot. This loop - also known as bunny ears due to its specific shape - is based on the figure-eight knot and it is particularly useful for equalizing the load on two anchors. The knot is easy to tie and forms two straight parallel loops. However, this knot is more difficult to untie. The double figure-eight loop reduces the rope strength by approximately 20%
How to tie a double-figure eight loop
Alpine butterfly knot
The alpine butterfly loop is one of the most secure knots for anchoring. It can be used for anchoring from different points as it handles three-way loading well, and interanchoring. In laboratory conditions, the alpine butterfly reduces the strength of the rope by approximately 39%.
How to tie an alpine butterfly
The alpine butterfly is not as easy to tie as some of the other knots mentioned above, and mastering this knot will require some practice. On the other hand, it is very easy to untie. Check the steps below to learn how to tie it.

When the knot is finished, you should see two crossing strands at the front side of the knot, as shown in the picture below:
Rope with a whipped loop
When tying an anchoring knot, there is always a possibility of error. If you want to minimize the possibility of this error, you should consider using a rope with a loop instead of a knot when connecting the rope to an anchor.

4. Belay knot for rope access
Finally, we will look at one particular belay knot - a Munter hitch.
Munter hitch
The munter hitch is used by climbers, rescuers, and rope access technicians as a friction device that helps them control the descent rate in a belay system. It is a continuously moving knot that is used with an HMS carabiner (or with a carabiner that is wide enough to take two turns of the rope). The munter hitch is easy to tie even with one hand or with gloves on.
How to correctly use a munter hitch
When using the munter hitch, you should remember one important thing: the part of the rope that goes to a belayer must not go through the gate of the carabiner. Use it as shown in the picture below.

Conclusion
Every rope access technician should know how to tie knots properly and effectively. A correctly tied knot is essential for security and safety when working at heights.
Learn and practice this important craft, increase your job performance efficiency, and protect yourself and others around you.
If you are looking for more detailed tutorials on tying knots, check out these two youtube channels: WhyKnot and BetaClimbers – both will help you learn how to properly tie knots mentioned in this article, as well as many others.